
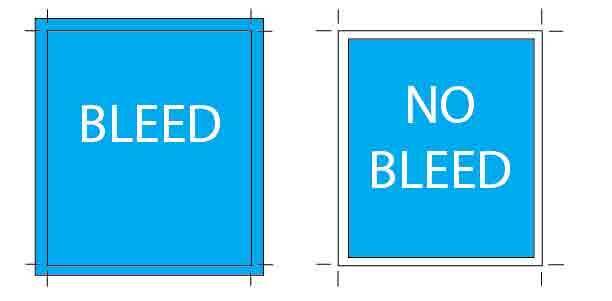
'Bleed' is an important element of creating print-ready artwork. Professional designers will always extend the background beyond the edges of the finished document by an additional 3mm. This ensures your final print is edge to edge without any of your text being cut off and avoiding ugly white borders. At beanprint.co.uk we require just 2.5mm for business cards on each side for other products it's 1.5mm on each side so a total of 3mm but often other printers will ask for more.
The full story
We have all been there, we want to create a flyer or poster and fire up our editor and create a blank document of our finished size. We spend hours getting the wording correct, and images in place and even call the grammar police to check everything is OK. Everyone is happy so we then hit the print button and fire off a copy to our desktop printer and we have white borders around the edges.
Yes, we can trim the white off but firstly that makes the print smaller than we intended also it dammed difficult to cut right along the edge so we cut off all of the white space. It's at this point it dawns on you that if only you had made the background a little larger then you could cut into the background avoiding the problem.
The problem also is that most domestic printers cannot print larger than the standard sizes, or if they do the paper costs can be outrageous. Commercial printers will be pleased to know to suffer the same problem; however, they have learned to overcome the problem by simply printing onto larger sheets of paper allowing the print to be larger than the finished size. For example, if you were printing an A3 poster beanprint.co.uk will print the poster onto a size called SRA3 (a bit like A3+) A3 dimensions are 297mm x 420mm whereas SRA3 is 320mm x 450mm which allows for this oversized print.
There is however a 2nd problem faced with high-production press printing and that is image creep. The image can and does shift slightly on each page printed. It does not matter which printing process you go for be it litho or digital, all printers will suffer with the image moving slightly from page to page. If your design does not contain bleed then those ugly white borders will appear but sometimes randomly every few prints due to the shifting problem.
The 3rd problem is at the finishing stage, on a print run all the sheets of paper are stacked and placed into a guillotine. This is not some small hobbyist single-sheet cutting device but a large extremely powerful machine capable of cutting through several telephone directories or fingers simultaneously. Although a guillotine operator will stack your sheets of paper carefully there will of course be slight differences in their position. We may be only talking about a small percentage of a millimetre but coupled with image creep and the whole job can be ruined at a single press of a button.
The Solution
The easiest way to overcome all these issues is too simple to extend the background past the point of your finished design. So if your plan is to create an A3 poster don't start with an A3 blank page but make it slightly larger. Here at Beanprint.co.uk, we require an overall bleed of 3mm so instead of creating your document 297mm x 420mm make it 300mm x 423mm. The extra 3mm (1.5mm on each side) allows the print to move slightly and also allows the cutting of your poster to ensure there are no white borders on any of the edges and any coloured backgrounds will go right to all the edges perfectly.
Positioning Text
As well as printers bleed being important, you should also be aware of the need to keep your text away from the edges. As a general guide for an A3 poster, your text should not be any closer to an edge than the full bleed (3mm in this case). Just as cutting can occur outside your design, it can also cut inside. If your text is placed too close to the edge, there is a risk of it being cut in half or even lost if it's small enough and placed too close. Therefore, if the bleed is 1.5mm, the bare minimum distance you should place your text is 1.5mm from where the cut will occur.
From a design point of view, text on the edge of a document or poster never looks cool. Your marketing message needs air around it to be effective. Although the closest you could place text to an edge is 1.5mm, it's typically best to come in a lot further than that. On a large A3 poster, it would not be uncommon to have the closest text 20mm or more from any of the sides.
For something smaller like a business card, 3mm to 5mm from the edge is normal. This may seem like a large area, but it's really not when you see the finished product.